This is an expanded version of an article that was originally published in the May 2025 edition of What's On.
Taro (Colocasia esculenta) is a tropical, starchy root crop. For backyard food growers, it's an easy, low maintenance producer of nutritious homegrown carbohydrates.
Once a taro patch is up and running it's a self-renewing, sustainable food source. And it can handle going underwater -- so when there's a big weather event that cuts the supply chain and the supermarkets run out of rice and pasta, your taro patch will come to the rescue.
If you live in the tropics or semi-tropics, are interested in food self-sufficiency and perhaps already enjoying a sense of achievement about growing some of your own food but still relying on supermarket staples to bulk out your meals -- you need to get acquainted with taro.
Taro - a staple food throughout the tropics and subtropics
Taro is recognized as one of the oldest cultivated crops in the world. It has a fascinating history including its part in the story of the Polynesian Way-Finders -- these amazing seafarers crossed vast oceans in canoes long before modern navigation instruments, and they brought taro with them on their voyages across the Pacific Ocean to Hawaii.
Taro ("kalo" in Hawaiian) became a staple food in Hawaii and has huge significance in Hawaiian culture.
Besides Hawaii, taro feeds millions of people in all tropical and subtropical regions, including Africa, China, Japan, New Guinea, all Pacific islands, the Caribbean islands, parts of Central and South America, and some regions in the United States1.
How to tell taro apart from other plants with "elephant ear" shaped leaves
All taro varieties have large, heart-shaped leaves on long stems coming from a thick, starchy base called the corm (the corm is the part you eat). The leaves, leaf stems, and corms vary in colour and size between the different varieties, but the general shape of the plant and the leaf is always similar.
In particular, taro leaves have a closed in "V" at the top of the heart shape.
Have a good look at the taro leaves below...
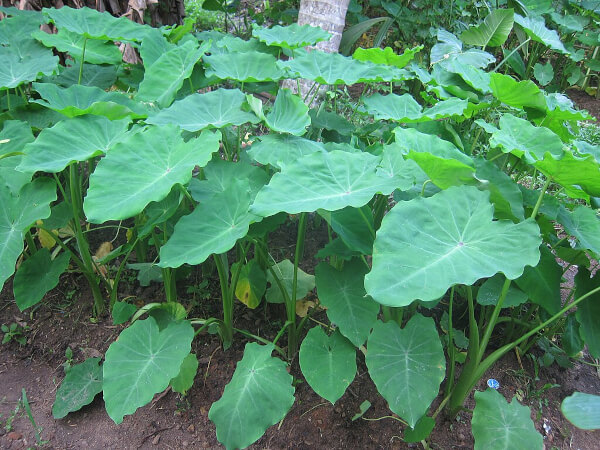
...and then compare them with the leaves in the next picture, which is a picture of "cocoyam" (Xanthosoma sagittifolium).
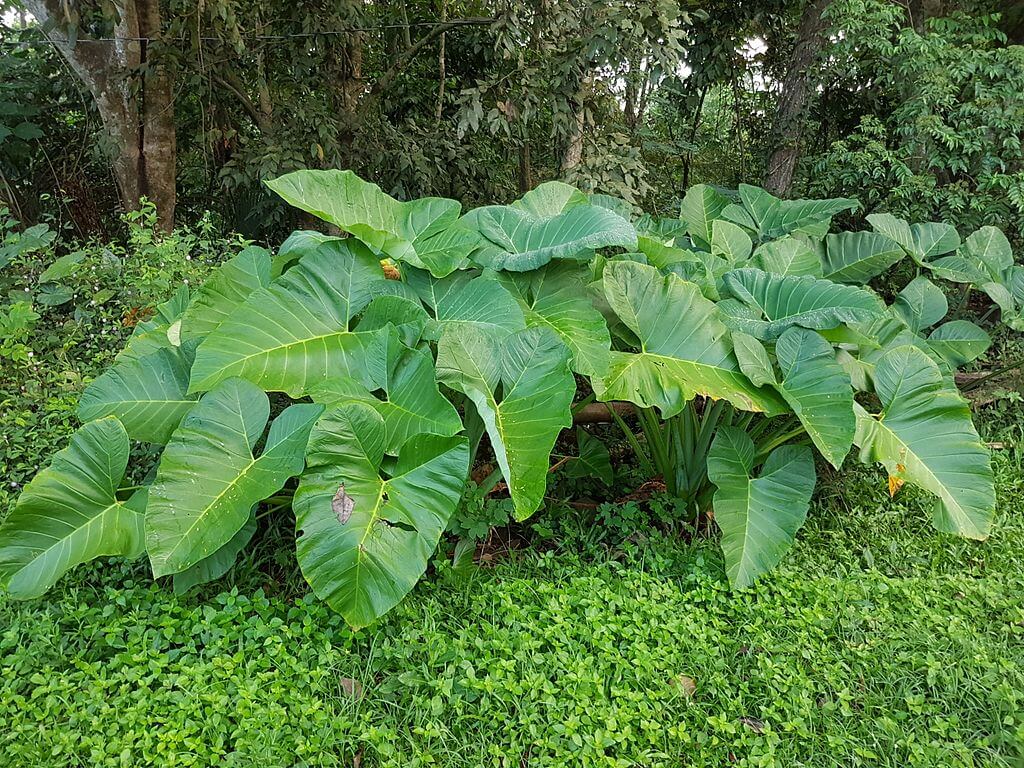
What did you see?
Look at the top of the leaf. See how the "V" at the top is closed in on the taro leaves, and open on the cocoyam leaves?
To the best of my knowledge all taros (Colocasia esculenta) have this closed in "V" at the top of the leaf.
Also to the best of my knowledge, plants whose leaves have the open "V" include some that are edible and some that are poisonous. The plant pictured above -- "cocoyam" (Xanthosoma sagittifolium) is one of the edible ones.
Having said all that, the safest advice I can give you about identifying taro if you're still unsure is to do what I did:
Get your taro (and any other plant you're going to eat) from someone who is eating it regularly. That's the one way you can know for sure that the plant you have is edible.
If that's enough for you on identifying taro, you can go straight to:
Or keep scrolling for more about the many, many common names and one scientific name for this plant that I'm referring to as "taro."
Taro's many "common" names and its one Scientific name
Plants have "common names" - often a great many different common names for the same plant, and scientific names - one scientific name for each plant.
Common names arise from local dialects and uses. If you're unfamiliar with the dialect, the uses, or the plant itself, common names can be misleading.
Scientific names are hard to learn, say, and remember, but they're more reliable than common names because (generally speaking) one plant can't have more than one scientific name.
Everywhere I look on the internet, I see confusion about the names of plants with "elephant ear" shaped leaves. Maybe one day I'll have a go at untangling it all and writing a post to try to clear up some of the confusion, but for this post I just want to make it clear that I'm talking here about "taro," also often called "dasheen" or "eddoe" along with dozens of other common names, too numerous to list here.
Lots of common names but only one scientific name: Colocasia esculenta.
(More on "dasheen" and "eddoe" in the next section.)
Two types of taro: "dasheen" types and "eddoe" types
Taro varieties can be loosely divided into two main types --
"Dasheen" types, or "wet-land taro," which are large to very large. They need very moist soil and are even happy to be periodically inundated. Dasheen types of taro produce a large central corm that you eat, and lots of baby offshoots for new taro plants.
"Eddoe" types are smaller than dasheens and can tolerate drier conditions. They produce small side cormels that you can eat all year round.
(If you really want to nerd out on taro types and names, you might be interested to know that "eddoe," Colocasia antiquorum, and "taro," Colocasia esculenta, were originally described as two separate species. But many later botanists consider them all to be members of a single, very variable species, the correct name for which is Colocasia esculenta2.
Within these two types, dasheen and eddoe, there are literally hundreds of varieties of taro to choose from in the tropical and semi-tropical regions of the world. Ask around in your local food growing community and be guided by local knowledge to find the ones that suit your area and your needs.
Growing conditions for taro
All taros like moist soil, and the large dasheen types are happy to be water-logged. If you have a wet area that you're not sure what to do with, plant some taro there.
If you don't already have a wet area and you want to make one, choose a spot and dig down at least 20 cm deep, line your hollow with lots of newspaper to slow the drainage, and fill/refill with compost or good quality soil. Once the taro is established, it and the soil microorganisms will start to change the soil so that it retains moisture more easily.
As well as consistent moisture, all taros love compost or well rotted manure and some extra potassium. To provide potassium, you could use ash from your fireplace, banana peels and leaves as mulch, or a potassium rich fertilizer.
Taro grows in partial shade to full sun. The larger varieties will shade out other plants, so it does need space.
In frost free areas you can plant taro year round. It may slow down or go dormant in the cooler months, and it will explode in warm, wet conditions.

In the image above you see "dasheen" type taro, or "wetland" taro, probably growing in Hawaii where taro is an important food crop.
Planting and growing taro
One of my favorite things about taro is its perennial, self-renewing nature. In the act of harvesting some to eat, you can also propagate more.
Taro connects your garden to your kitchen -- the more taro you take to the kitchen, the more you have in the garden.
Planting, harvesting, and replanting dasheen taros
The thick, starchy, hard corm at the base of a large dasheen-type taro plant has lots of little "eyes," each of which will produce a new taro plant.
You can twist the baby plants off when they're about 15 cm tall, and plant them in a new location. Or you can let them grow right where they are and as they become more crowded they'll push the large, original corm up out of the ground so it's easier to harvest for eating.
Lift the largest corm out and settle the others back down into the hole it leaves. Twist off and plant any little baby taros that have formed from the eyes of the mother corm -- even if they're still tiny, most of them will grow.
Planting, harvesting, and replanting eddoe taros
Eddoe-type taro plants also produce small side cormels from the mother plant, but in this case you can eat the side cormels all year round (leave a few if you want your taro patch to grow larger) and leave the mother plant to produce more.
Growing new taro plants from the top of a corm
You can also grow new taro plants of both types by replanting the top of the starchy corm after harvesting the bottom section for eating.
When you replant the top of a taro plant, cut off all the leaves to reduce moisture loss. It'll grow new leaves after it has enough roots to draw water for them.
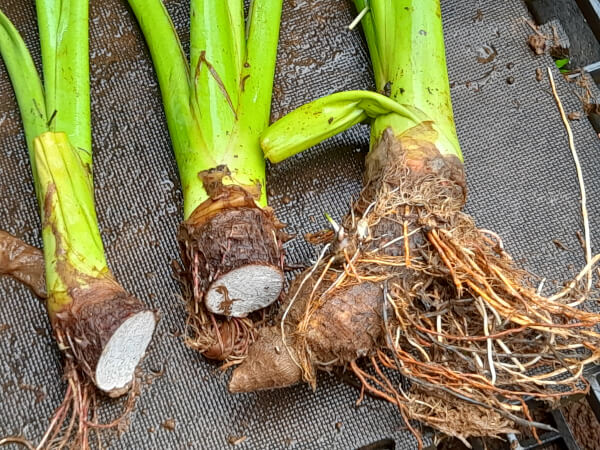
In the image above, you can see two taro tops that have been cut off the top of a corm, ready for replanting. On the right, you can see a small corm with a little "eye" sprouting into a new baby taro plant.
Spacing your taro planting
When I'm planting a dasheen taro patch I crowd the plants together in a tight clump of 3, then enough space to allow for compost and mulch between the clumps, then 3 more.
Eddo types can be spaced out a bit more, leaving room around each mother plant for lots of cormlets.
How will I know when to harvest?
It can take up to 7-12 months after planting before your taro patch is producing lots of corms big enough to harvest. From then on, so long as its moist and well fed and you keep replanting as you go, your patch will be perpetually productive in frost free zones.
Preparing your taro for cooking
Ok, so you've harvested some taro -- you have in hand a muddy corm, possibly very large if it's a dasheen (the ones in the pic above are very small; I was impatient to try some), with roots sticking out all around the bottom and leaves growing out the top.
Cut off the top, including about 2 inches of corm (like the two on the left in the pic above), and replant it.
These have been scrubbed and allowed to dry. To the bottom left, you can see a top that could be replanted:
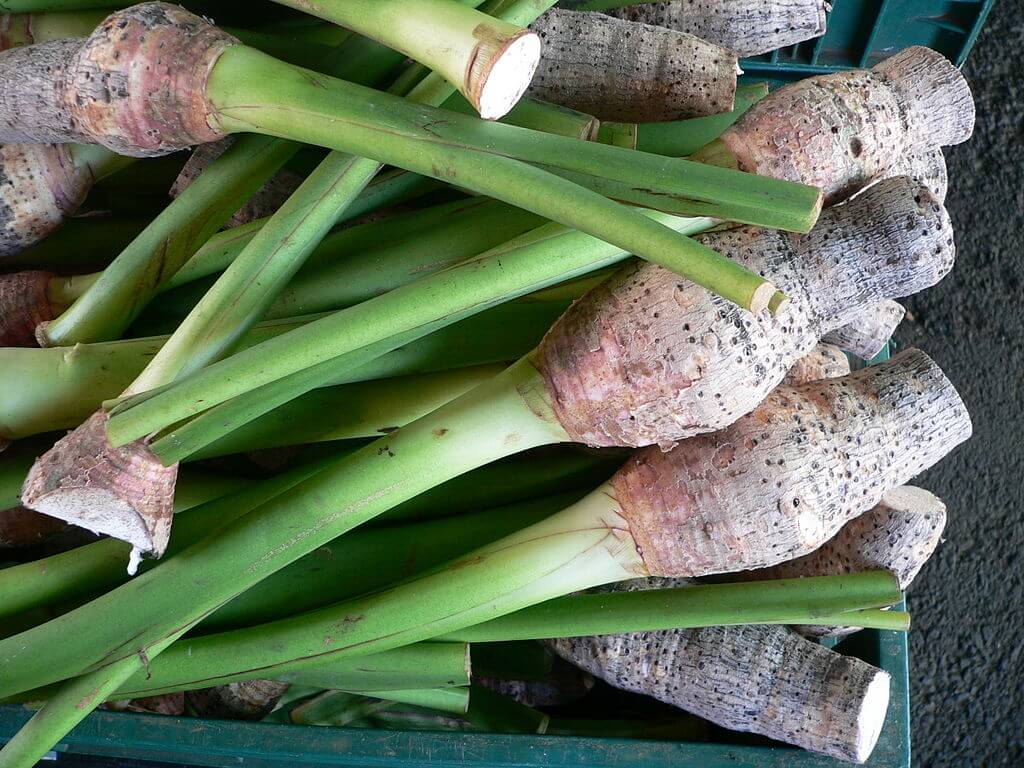
Scrub the remainder under running water, removing the roots and debris, then rinse, peel thickly, and keep rinsing as you go. It can be slippery, and may be slightly irritating for some people - so keep rinsing your hands as well as the taro.
Cleaned, peeled, ready to cook:
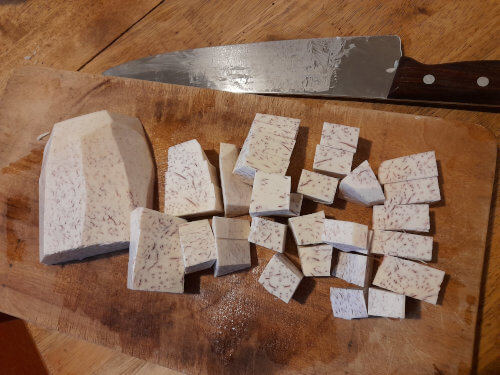
Once it's well peeled, cut out any brown bits and it's ready for cooking. The simplest way to begin is to chop into chunks and boil until it's easy to pierce with a fork. Discard the cooking water.
Now you can do anything that tickles your fancy, from eating it as is with butter and salt (yum), to mashing it and using it as a flour replacement in a cake recipe (google "taro cake recipes" for ideas), to freezing it for later use.
You can also bake or steam taro, or slice and fry it to make chips or crisps.
The well known Hawaiian dish, "poi," is made from steamed/boiled, mashed, fermented
taro -- sour but nourishing and said to be very good for invalids, babies, or those with
compromised digestion.
One Small Serve - an eBook

Learn how to grow and use 7 easy, low maintenance, nutritious food plants that are productive for two or more years without replanting.
Growing and processing your own food is a huge task. In One Small Serve, I show you a smaller, simpler approach.
Establish a "one-serve-at-a-time" home-grown food habit you can maintain.
Includes a series of free extra tips + free email support
Please comment 🙂
Do you grow taro? Please share your taro experiences and tips, and questions are welcome too.
would you like to receive new posts in your inbox?
after clicking subscribe, sit tight for a confirmation message
Endnotes
- https://encyclopedia.pub/entry/47697
- Scroll down to the sub-title "Taxonomy at this link.
